Category Archives: Behavior

Thundershirt

ThunderShirt
(Anxiety wrap)
By Dr. Karen Burgess 


Brand name

  • ThunderShirt

What is ThunderShirt used for?
ThunderShirt is used to help alleviate stress or tension in dogs and cats.  Originally designed for dogs with thunderstorm anxiety, recently owners have seen improvement in a variety of stressful situations with the use of a ThunderShirt.

How does ThunderShirt work?
Temple Grandin, a reknowned animal science expert has over the years used her own experiences with autism to research behavior in animals.  Through this and other research it has been shown that pressure can have a calming effect on both people and animals.  This concept was used in the development of the ThunderShirt and its “hugging” design.

What conditions is ThunderShirt used for?
ThunderShirt use is appropriate for any situation that elicits fear or anxiety in a pet.  While the ThunderShirt may not help 100%, the goal is to see if there is any noticeable improvement.

How long can my pet wear the ThunderShirt?
It is safe to use the ThunderShirt for extended periods of time but is best to use it for more limited timeframes/times directly associated with problematic behavior.

How do I determine the right size of ThunderShirt for my pet?
Use a tape measure to determine the size of your pet around the chest cavity just behind the elbows.  Use chart below to help determine appropriate sizing.

How do I put the ThunderShirt on my pet?
Put the ThunderShirt on your pet’s back, then take the ShortFlap under the chest.  Next wrap the LongFlap under the chest and secure it snugly to the ShortFlap.  Take the TopFlap and wrap it down securing it onto the LongFlap.  Adjust as needed for snug fit.  Finally wrap the ChestStraps around the dog’s front and secure.

How do I wash my ThunderShirt?
Wash ThunderShirt in a regular wash cycle with cold water and laundry detergent.  Do not dry in machine, hang only.

Is ThunderShirt guaranteed?
ThunderShirt as a company provides a 45 day money back guarantee for its product.  If purchased through our hospital and returned the company then donates the product to a local shelter.  A no risk endeavor with a win-win return policy.

What other concerns may there be with ThunderShirt?
Take care that the straps on the stomach area do not abrade the prepuce on male dogs.  With initial use, remove jacket after shorter time periods to look for signs of irritation.


Size

Chest Size

Weight

XXSmall

9″ – 13″

up to 7 lbs

XSmall

13″ – 17″

8 – 14 lbs

Small

17″ – 21″

15 – 25 lbs

Medium

21″ – 25″

26 – 40 lbs

Large

25″ – 30″

41 – 64 lbs

XLarge

30″ – 37″

65 – 110 lbs

XXLarge (Camo only)

37″ – 50″

Over 110 lbs


Photo Credit: <a href=”https://www.flickr.com/photos/8489692@N03/5903289588/”>katerha</a> via <a href=”http://compfight.com”>Compfight</a> <a href=”https://creativecommons.org/licenses/by/2.0/”>cc</a>

Muzzles

Muzzles
By Dr. Karen Burgess


What is the purpose of a muzzle?
Muzzles are typically used to protect people or objects from a dog or cat’s mouth, chewing, or biting.  While commonly associated with aggressive animals, muzzles are protective in nature, allowing a pet that might not normally be handled safely or into a particular environment more latitude.  Muzzles are particularly helpful when a pet is in a potentially painful or stressful situation and may unintentionally bite or harm a person.  In some jurisdictions certain dog breeds are required to be muzzled in public. 

Types of muzzles available
The two primary categories of muzzles are basket and nylon or tube type.  Several examples are shown below.  Things to consider when selecting a muzzle include

  • Sturdiness and security-it is essential for all involved that a muzzle stays in place and not slips off at an inopportune time.  An effective muzzle should also be able to withstand a pet pawing at it or trying to pull it over its head.
  • Ability to pant-dogs cool themselves off by panting.  If the mouth is held closed in particular for extended periods of time overheating can occur
  • Ability to see pet’s facial expression-visual cues clue us into our pet’s state of mind.  Some muzzles effectively block the ability to see a pet’s face.
  • Ability to drink or eat while muzzled-there is definite benefit to being able to still eat and drink while muzzled.  Treat rewards are often used to reward nervous pets and the ability to give these while wearing a muzzle is often beneficial

Specific styles/brands of muzzles

  • Baskerville Ultra Muzzle-basket style, rubber, third strap and collar loop, can feed treats through
  • Jafco Muzzle-basket style, clear version available, newer version can feed treats through, good for preventing licking wounds or eating foreign bodies
  • Wire or Cage Muzzles-can be more damaging if pet hits muzzle on objects or people
  • Leather Basket Muzzle-often used for security type work, more expensive, requires more maintenance to care for the leather
  • Tube type muzzles-leather preferable to nylon for restraint/protection, standard muzzle type used in veterinary medicine, safe and effective for short time periods only as mouth is held shut and panting prevented, care should be taken as some pets can still bite with tip of mouth that is not enclosed in the muzzle

How to properly fit a muzzle on your pet
Fit is often determined by the specific style of muzzle being used.  When fitting a muzzle ensure that a pet can open their mouth at least partially in a basket muzzle, that the complete nose is contained, and that the muzzle fits securely behind the neck.

Initial response to a muzzle
It is best to first desensitize a pet to being muzzled.  Some pets will become very passive muzzled, others will paw relentlessly at their face.  In the end, safety and prevention of self-trauma are both important.

How to desensitize to wearing a muzzle
Optimally a pet is first introduced to a muzzle in a non-fearful  and comfortable situation.  Initially let the pet explore the muzzle, sniffing  and investigating it, while providing treats to create a positive association.  After this, put some treats in the muzzle and have your pet eat them out of the muzzle.  Gradually put the treats farther in the muzzle forcing your pet to put their nose farther forward into the muzzle.  Next, after having put treats at the end of the muzzle, put the muzzle on for a few minutes but do not fasten it, pulling it off immediately and giving treats and verbal praise.  Finally, put the muzzle on as above and fasten it, gradually increasing the wearing time.  If you pet becomes anxious or distressed while muzzled back up in the training process until they are again calm.  Ultimately getting your pet used to thirty minutes in a muzzle should be the goal.  Avoid removing the muzzle if your pet is pawing at it as this can lead to further objection in the future.  Instead try and redirect them with verbal commands or a soft tug on a leash.


More detailed descriptions of muzzle training can be found at

Children & Pet Safety

Children and Pets: Safety Tips
By Dr Karen Burgess


Newborn

  • Place dog in crate and make it a positive experience. Place a bone or favorite chew toy in with the dog
  • Brush up on obedience skills- use lots of food as rewards
  • Have the dog become accustom to varied feeding and walking schedules (as times will be hectic with a newborn)
  • Place a blanket the baby was using with the dog and allow to investigate
  • Bring the baby around only while the dog is calm- otherwise crate the dog with that favorite chew toy or bone
  • Make sure all experiences the dog has around the baby are positive

Toddler

  • Do not allow toddler around the dog while eating or sleeping
  • Dog crate or dog bed is off limits
  • Reward the dog with treats for being calm around the toddler
  • Recognize warning signs and place the dog in his safe spot before he gets to the point of snapping or growling

School-Age Children

  • Have the children become involved in the daily pet chores
  • Children should learn to stand still if the family dog is too frisky or any dog scares them
  • Teach children to avoid strange dogs and strangers with dogs
  • Clicker training with children is both great for the children and the pets. Even a child as young as three can learn to help with clicker training.

Bite Prevention

  • Teach children how to protect themselves with an overexcited pet by:
    • Rolling into a ball
    • Protecting hands and face
    • Calling for help
    • DO NOT run and scream

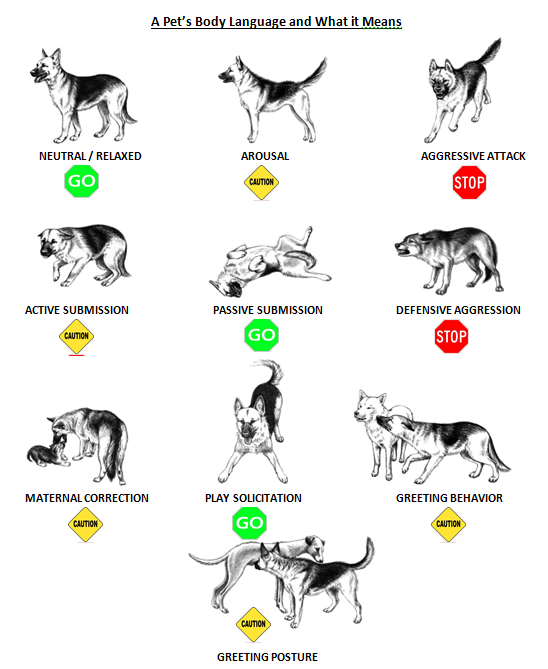
dog body language

Digging, Canine

Digging Behavior
By Dr. Karen Burgess

Digging can be a very frustrating and damaging problem.  Common causes include boredom/lack of exercise, hunting prey such as moles or voles, temperature control (cool area to lie in the summer), retrieval of buried objects such as bones, and nesting behavior.  Anxiety can also lead to destructive digging.

A few things that may help with unwanted digging include:

  • Control of underground vermin.  Take care to use products or means that will not inadvertently hurt your own pet.
  • Creating a cool shaded area of the yard.
  • Create a dig friendly zone.  Make the area visually different from the rest of the yard either with landscaping or fencing.  Bury desirable items in the area to encourage digging in the area (bones, toys, etc.).  Whenever your dog is seen heading to dig in inappropriate areas redirect them to their new dig zone.  The key is catching them prior to digging in other areas so supervision is essential.  Plastic swim pools full of dirt are another option.
  • For dogs that are digging under fences place a layer of chicken wire or hog panels (from local farm store) flat on the ground.  Grass will grow over this.  Grass should be able to grow through this and the area can even be mowed.
  • Some have had success with placing a pet’s own feces in the holes they dig.

Abcess, Feline

Cat Bite Wounds & Abscesses
By Dr. Karen Burgess

Cats are highly territorial and often fight when they meet outside or, less commonly, within the household. During fights, cats inflict deep bite wounds that inject bacteria from the mouth into the internal tissues. Cat bite wounds frequently become infected and abscessed. An abscess is a pocket of infection that the body has walled off.

Signs of Abscesses
If you know your cat has been in a fight, it is a good idea to examine him carefully for signs of injury. Bite wounds may leave only tiny puncture holes on the skin. Veterinary care is always recommended for cat bite wounds. More often, you will not know that your cat has been fighting until an abscess forms. Signs of an abscess include fever, lethargy, loss of appetite, pain and the appearance of a swollen area. Hair may be lost in the area, and the skin may rupture, leaking foul-swelling pus onto the fur. The most common areas for bite wounds and abscesses are the face, legs, and the base of the tail.

What is an Abscesses
An infected bite or claw wound is a common infectious disease for cats. The wounds occur when deep punctures through the skin are inoculated with bacteria or foreign material and subsequently lack drainage. A decrease in oxygen tension allows growth of anaerobic bacteria. Aerobic, mixed, and fungal infections may also occur in the wound sites. The most frequently inoculated organism is Pasteurella multocida, an aerobic gram-negative bacterium commonly found in the mouth of cats. Fusobacterium, Prevotella, E. coli, and Clostridium spp. are among a number of other possible bacterial agents.

How Abscesses are Diagnosed
Your veterinarian can usually diagnose the abscess based on a physical exam. It may be necessary to shave hair from parts of the body to look for bite wounds.

Abscess Treatment
Cats typically require anesthesia for initial drainage and cleansing of the infected area. All of the pus and dead tissue will be removed. The wound is encouraged to heal without trapping bacteria under the skin again. This usually means that the wound is left open so that the internal tissues heal first, before the skin. Drains may be placed temporarily under the skin. In addition to giving oral medications, it may be necessary for you to administer topical antiseptics or antibiotics directly to the wound area. Hot packing the area with a warm, wet washcloth for 5-10 minutes twice daily is also beneficial. Most cats heal well with proper treatment.

Even though an untreated abscess usually ruptures and drains on its own, recurrence is extremely common without professional care. Cats with abscesses can also get sick enough to stop eating and become severely dehydrated. Prompt medical attention is a must for all cat bite wounds and abscesses.

Biting is the most common means by which some serious cat diseases are spread. Feline Leukemia Virus (FeLV), Feline Immunodeficiency Virus (FIV), and Rabies can all be spread by bites. If your cat goes outside he should be vaccinated against FeLV and Rabies. Your veterinarian may also advise testing for exposure to FeLV and FIV after a bite.

Preventing Abscesses
The main mechanism for preventing abscesses is keeping cats indoors, where they are less likely to fight. Routinely checking your cat for injuries is also a good idea.

Scratching Recommendations, Feline

Recommendations to Prevent Scratching
By Dr. Karen Burgess

   
  • Scratching post-  How can I get my cat to use its post

      Since cats use their scratching posts for marking and stretching, posts should be set up in prominent areas, with at least one close to the cat’s sleeping quarters. The post should be tall enough for the cat to scratch while standing on hind legs with the forelegs extended and sturdy enough so that it does not topple when scratched. Some cats prefer a scratching post with a corner so that two sides can be scratched at once while other cats may prefer a horizontal scratching post. Commercial posts are often covered with tightly woven material for durability, but many cats prefer a loosely woven material where the claws can hook and tear during scratching. Remember that scratching is also a marking behavior and cats want to leave a visual mark. Carpet may be an acceptable covering but it should be combed first to make certain that there are no tight loops. Some cats prefer sisal, a piece of material from an old chair, or even bare wood for scratching. Be certain to use a material that appeals to your cat.

      Every time the pet approaches the post, toss a very small treat to it. When it touches the post, toss a bigger treat, and when it scratches give it several treats. The pet should be within eyesight of a family member at all times. Whenever it starts to scratch furniture, the behavior can be interrupted with a water gun or toss a bean bag tossed near it. The family member shouldn’t say anything or look at the pet when this is done. Anything that is exceptionally startling for the pet or elicits a fear response should be avoided. Whenever the cat can’t be watched (out of the home, busy or sleeping), it should be confined to a room without objects that it will likely scratch except its scratching post. Once it is frequently scratching the post on its own, freedom without supervision can gradually be allowed.

  • Trim nailsStart trimming early and often to get the cat used to nail care. Combine with stinky cat food (e.g. Fancy Feast) to help the cat realize nail trims are not so bad.  Ideally trim every 2-4 weeks.
  • Feliway spray– a synthetic “happy” pheromone that comes in spray and diffuser.  Discourages cats from scratching in areas where applied.
  • Double sided tape or Sticky Paws-applied to areas where cat is scratching may discourage behavior.
  • Innotek SSSCAT or doorknob alarm (available at travel stores)
    A motion detector that hisses when the cat approaches the problem area.  Even the most fearless of cats clear the area when it activates.
  • Vinyl carpet runner
    The back-side of a vinyl carpet runner (that has a very prickly feel) can be cut and placed in the areas that you want your cat to avoid.
  • Solid air fresheners, strong citurs fragrance/cologne, spray anti-perspirant
    Cats dislike perfume.  An air freshener may keep the cat away from an area until it has evaporated.  (Never put it near the litter box or a feeding area).  Scented dryer sheets may have the same effect.
  • Pavlov’s Cat Scratch Feeder-product rewards pet with food when they use scratching post. http://www.mktmkt.com/pavlovscat.html
  • Microfiber-reportedly is resistant to cat scratch damage and resilient for washings.
  • Hang a towel over the side of the furniture with six empty aluminum cans on top of the towel. When the cat scratches, the cans will tumble down.
  • Attach balloons to the side of the furniture. Hang a short ribbon on each balloon so the cat will swat at the ribbon and pop the balloon.
  • Cover the furniture with plastic or canvas drop cloths.
  • Softpaws Blunt acrylic nail caps are glued onto the cat’s claws. The idea is that the blunt nail will not be sharp enough to cause damage.  The nail caps will wear off but not at the same time. After a couple of weeks some of the nails will be capped and others will not be. The nail caps must be replaced as the nail grows out.  Some cats are not in the least discouraged from scratching by these caps and are able to simply scratch larger holes in the upholstery.

Building a Sisal Wrapped Scratching Post

This scratching post has been cat tested and approved by various felines. If you would rather buy this scratching post already made, SmartCat makes a sisal post called the Ultimate Scratching Post.  The reasoning behind this cat post is simple. A post should be as high as your cat is tall when he is fully stretched out plus a few inches. The post should also be wide enough that your cat can sit on top and survey his surroundings. The base should be sturdy enough that the post will not tip over. Once a post tips over on a cat it is very hard to convince a cat to use the post again. The post should be wrapped with sisal rope because cats like something to dig their nails into. (Picture below)

Supplies needed:

  •       One (1) cedar post that is about 30″ tall and at least 4″ in diameter
  •       A bundle of non-oiled sisal rope measuring a 1/2″ wide
  •       A piece of 3/4″ plywood to make the base sturdy (at least 16 x 16 diameter)
  •       1/2″ roofing nails
  •       Four (4) 3/4″ 16d coated sinker nails

Directions:

Before beginning, make sure the post is dry so that there will not be any shrinking of the post after the sisal is wrapped on. Wear a pair of work gloves when you wrap the sisal around the post. Nail the beginning of your rope all the way around the top of the post. Then wind the rope around and around and around the post very tightly so that there is no air space between the pieces of rope. When at the bottom, once again nail the end of the rope all the way around the bottom of the post. Next nail the base on to the post, use at least four nails and pound them through the bottom of the plywood base and into the bottom of the post.

Litterbox Article, Feline

 Litter Box Information
By Dr. Karen Burgess

Inappropriate elimination, or urinating/defecating outside of the litter box, is one of the primary reasons cats are relinquished to shelters.  While a common issue when a cats are faced with stress, anxiety, or pain, inappropriate urination has many causes and thus many potential solutions.

As a human, we flush the toilet after every use.  A cat’s sense of smell is more sensitive than ours, so having to walk through a soiled litter box is a less than appealing prospect for naturally clean loving cats.  In the wild, felines find a new area to eliminate avoiding this issue.  In the home it is then understandable how a small box may become far less appealing than the “open land” found in a living room, closet, or under the bed.

When first faced with a litter box issue, contact your veterinarian to discuss possible medical causes.  Cats do not like associating pain with their elimination location so bladder infections, arthritis, or constipation can all contribute to a litter box aversion.  Also remember that punishment is never recommended for soiling issues.  It does not address the problem and may increase stress making the problem worse.

Top reasons that cats stop using the litter box:

  • Dirty litter box
  • Litter box style (too small, covered)
  • Litter type (odor, consistency)
  • Too few litter boxes in household
  • Medical problems
  • Behavioral issues
  • Litter box environment (sounds, lack of privacy, surrounding texture, lighting)
  • Landlocked litter box (no escape route if cat is startled or frightened, i.e. by housemates.

Dirty Litter Box

  • Litter box should be scooped at least twice daily
  • Cats can smell even the smallest amount of urine.  Clumping litter allows liquid and solid waste to be removed completely. Non clumping litter allows adequate removal of feces but not urine.  Kittens younger than 8 weeks of age may do better in the short run with non clumping litter.
  • Litter boxes should be completely emptied of litter and cleaned (vinegar and water) every 2 to 3 weeks.
  • Proper cleaning technique-for excrement to be completely removed it needs to essentially be in a ball.  If residual urine or fecal matter is being scraped from the bottom of the litter pan this is not clean in a cat’s mind.  Proper litter depth is essential allowing for the scoop to go below the clump and elevate it completely.  If litter/matter is stuck to the side of the box, push the litter from the side of the box, spray the area with 1 part bleach to 30 parts water solution and wipe with a paper towel.  When dry, re-spread litter.

Litter Box Style/Size

  • Covered litter boxes are appealing to humans but are often a turn off to cats.  While the covered box size may be similar to a regular box, the “hood” does not allow a cat to hang their head over the side making it a more confining space.  This also may force cats to change their posture for elimination (“scrunch up”) which in some cases can cause discomfort.  Covered boxes limit visibility which can be frightening and lead to a feeling of entrapment.  This can be a significant concern in households where all feline members do not get along.  Combine all of these factors with increased odor retention, increased dust exposure, and inability for owners to see a dirty box and one can quickly see why covered boxes are not optimal.
  • Bigger is better when it comes to litter boxes.  A cat should be able to turn around completely in their box and not touch the sides.  A good sized box should be a minimum of 22” by 16”.  Consider non-conventional litter boxes such as plastic storage containers.

Type/Amounts

  • Added scents or perfumes are made appeal to humans, not to cats.  In some cases, these additives can be an aversion.  Look for unscented, carbon based clumping cat litter (Examples-Fresh Step Perfume and Dye Free, Ever Clean Unscented, Scoop Away Free, read labels carefully).  The best way to control odor is frequent cleaning of the litter box.
  • Litter should be 4 inches deep.

Litter Box Numbers

  • There should be at least one more litter box than the number of cats in the household.  Often cats will avoid a litter box that has been used by another cat while other cats may choose to use one box for urination and one for defecation.

Litter Box Location

  •  Litter boxes should be located in quiet low traffic areas away from food and water bowls.  Ideally they should not be cornered, meaning a cat using the litter box should feel as though they have at least two viable exit strategies (i.e. doors, vertical jumping spots) if placed in a frightening situation.
  • Avoid placing the litter box on unappealing textures that may cause discomfort for the cat as they enter the box.
  • If a house is multilevel, place a litter box on each level if possible.
  • When obtaining a new cat or kitten it is best to confine them to a smaller area until acclimated to the environment and litter box.  Over time gradually increase their free range allowing them to find their own way back to the litter box.

Storage Container Litter Box DIY

  • Consider making your own litter box using a large storage container or cement mixing container (approx. dimensions 19.5” W by 29.5” L by 19” H).  With a litter depth of 4”, the bottom of the door can be made at 8” from the ground.  The door should be approximately 9” by 9”.  Using the short side for the door can prevent unintentional urination out of the door.  As reference, 70-80# of litter will be required for the appropriate depth.